Are you looking for ways to improve your website performance? Google Search Console is one of the best tools to improve your SEO and online visibility. But if you don’t know about it and how to set it up, this guide is for you. We are here to help you with how to set up Google Search Console for your website.
However, the fun part is Search Console is a free tool provided by Google. So, without thinking twice, set up your website now, and take your web development to the next level.
So, let’s start it.
What is Google Search Console & why is it important?
Google Search Console is a free platform that helps to increase the SERPs ranking by tracking your SEO performance. It’s a tool by Google that lets you improve your website metrics like rankings, clicks, etc. In other words, it is an excellent platform for enhancing your website’s online visibility and mobile-friendliness.
As for its importance, it’s listed below
- It helps monitor your website’s Core Web Vitals
- To identify backlinks
- To drive traffic
- In finding & fixing errors
- To Add sitemaps
Hence, we strongly recommend using GSC and getting as many benefits as possible.
How to set up Google Search Console
We are sure you now know what Google Search Console is and its main benefits. So, let’s start our guide on how you can set up Google Search Console for your website.
1. Creating your Google Search Console Account
Setting up a Google Search Console account for your website is simple. If you have an existing Google account, you can access it anytime. And in case you haven’t created a Google account yet, you’ll have to make a Google account first.
Once you’ve created your account and logged in, the next step will be adding and verifying your website.
2. Adding your website’s domain or URL prefix as a property
The next task is to add your website as a property. Once you sign in to your account and click “start now,” you’ll see two options for adding your property. The first option is as a domain, and the second is by using a URL prefix.
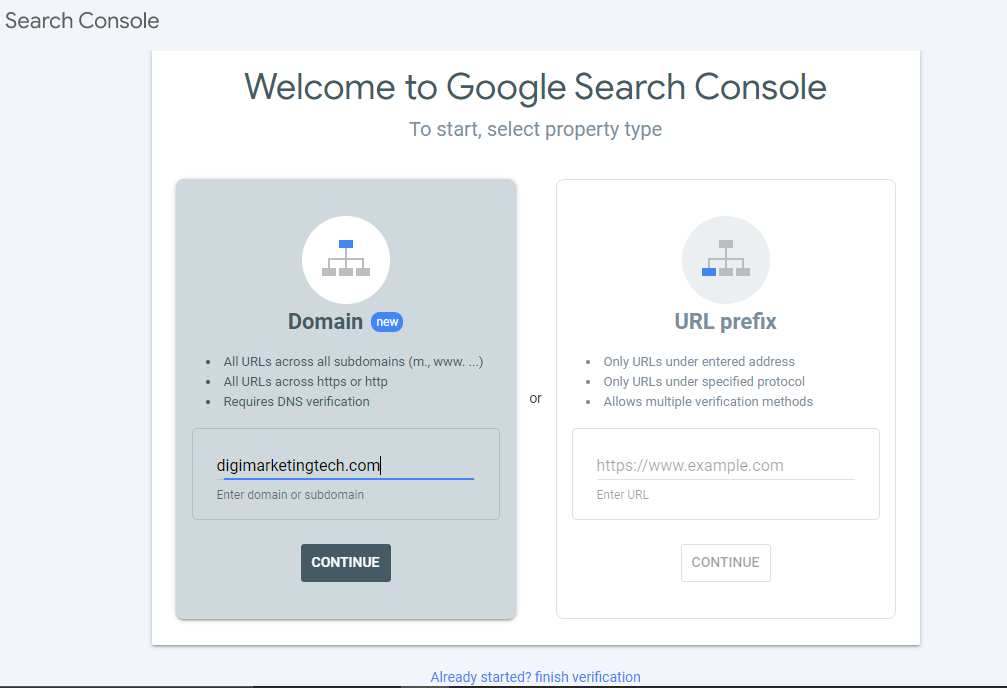
Now let’s take a quick look at what Property, Domain, and URL Prefix mean.
- Property: The term GSC uses to track a website, URL, or mobile app.
- Domain: Any website’s name without http(s):// or www. like digimarketingtech.com. In contrast, a subdomain means adding an extension to the domain, such as www. Or http.
- URL: The address of any webpage which can lead to a page of any site.
- URL Prefix: The protocol you use before your website’s domain, like http:// or https://
We recommend you set up your website using your domain, as it is easier. Using a domain signifies that your property includes all the subdomains and URL prefixes connected to your domain. To go by the domain, enter your website’s main domain in the box and click on the ‘continue’ button.
However, if you choose a URL-level property, you have to add it numerous times for each version. So to continue, enter your URL and click on the ‘continue’ button.
3. Verifying your website
After completing the above process, you need to complete the verification process. It is the final step to verifying your site’s ownership. This process differs depending on your chosen option in the former step. So, let’s look at each method.
Domain verification
You can only verify your website using your domain through your Domain Name System provider or DNS provider.
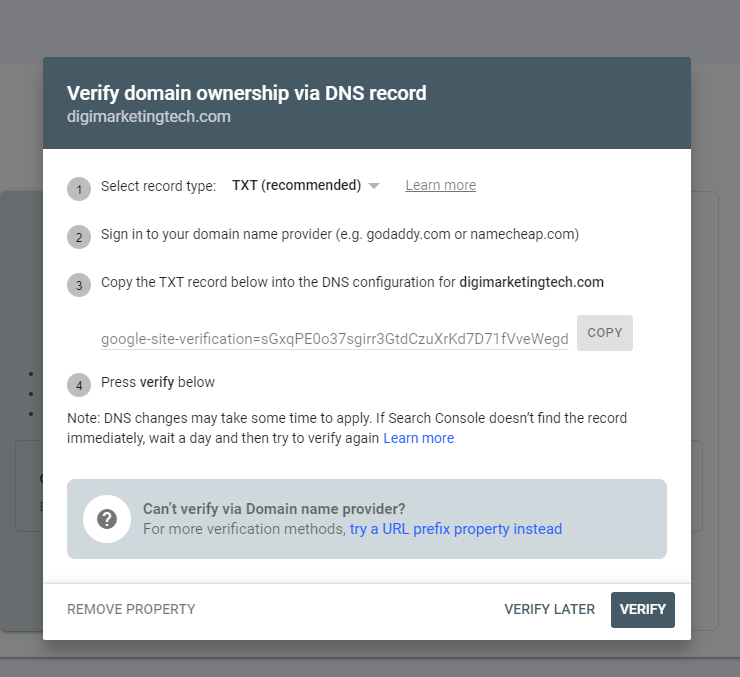
- To start the verification process, check if you have your DNS provider in the dropdown menu. If your DNS provider is in the menu, you can select it to access detailed instructions. However, if you can’t find it Select the “Any DNS service provider” tab.
- Next, click the ‘copy’ button to copy the TXT record GSC has provided.
- After you’ve copied the TXT record, open your DNS provider’s site in a new tab and log in.
- From the list of domains you own, choose the one you want to verify in Google Search Console. Next, search for the option for managing your DNS records which will be located in different places depending on your site. Once you find any ‘DNS’ button click it.
- Next, you’ll find a domain management screen and a list of your DNS records. Click on ‘Add’ to create a new record.
- Select “TXT” under the “Type” button and type “@” under the “Host” button. Next, select 1 hour at “TTL” and paste the TXT record into the “TXT Value” button.
- Now click “save” to add a new TXT record in GSC.
- Now go back to your Google Console and click on “verify.”
Once you complete the whole process accordingly, you’ll see a success notification signifying that your website is verified. Usually, this process takes up to 72 hours to complete. Hence, don’t panic immediately if this process takes a long time. Instead, give it a rest and come back in a few hours before giving up.
Verification for URL prefix
You can use several ways to verify your website by URL prefix.
Here are some practices you can apply.
HTML File: To verify through this method, you must upload an HTML file to your website’s root folder.
- First of all, download the file by clicking on the download box.
- Access your website’s root directory.
- Upload the file in the designated space.
- Get back to Search Console and click on “verify.”
However, if you are unfamiliar with this method and don’t have confidence, it is better not to use it.
HTML Tag: To use this method, add a meta tag on your website’s head section. Hence, you’ll need access to your website’s CMS.
For example, if you use WordPress for this method, there are two ways you can do it. First, you can add your meta tag directly in the header.php file, and second, by using a plugin.
To use the plugin method, follow the below steps:
- Start by copying the tag.
- Next, log in to your website’s WordPress admin on a different tab.
- Now install the “Insert Headers and Footers plugin” to your site.
- Then, go to Settings and insert headers and footers
- Now, paste the meta tag in the “scripts in header” option
- Go back to Search Console and click on “verify.”
Google Analytics or Google Tag Manager:
Lastly, if you want to verify through Google Analytics or Google Tag Manager, set it up with your website. And if you are using this method, you can verify it just by clicking a button.
What’s next after completing your GSC Account setup?
Once you set up your GSC for your website, you should immediately submit your sitemap to GSC. It is one of the crucial factors for a better SEO ranking in Google.
Hence, follow these steps to add your sitemap on GSC.
Find your site’s sitemap in Search Console by clicking “sitemaps.” Then add the URL of your site’s sitemap. These steps will make sure that Google has crawled and indexed your site.
From now on, you can track your metrics. Also, you can use the best practices to improve your website’s SEO ranking with the help of Google Search Console.
Another solution
Hope you’ve learned how to set up Google Search Console for your website. However, if you’re still confused or want a helping hand with your website’s development, feel free to contact Digi Marketing Tech. The marketing agency provides almost all online marketing services at a reasonable cost.